Monday, August 29, 2011

Poppies!

Contrary to popular belief, red and black CAN work for a summer wedding.  The key is keeping the look clean and fresh, which was exactly what bride Evegenia had in mind when she came to me with her ideas for a cake adorned with red poppies.  We met only a week before the wedding (!), but her enthusiasm and energy made it a breeze.  I ordered the gum paste flowers from Deco Pac, but I would love to be able to make them myself someday!  So pretty! 

This small three-tiered cake serves about 60 people.  The icing is Fresh Field's signature Italian buttercream, adorned with black fondant bands I imprinted with a small pizza-cutter-like tool and piped on random pearls.  Inside, white cake with strawberry mousse (made from scratch by French chef Nick) and chocolate cake with ganache filling.


Via http://blog.carissachristine.com/


You can view more photos of this wedding at photographer Carrissa's blog here.  Evegenia's personality totally shows on film!  I love her dress and shoes, one more example of the new wedding rules: Anything goes! 

xoxo,
Rachel

Tuesday, August 23, 2011

Shimmer and Swirl

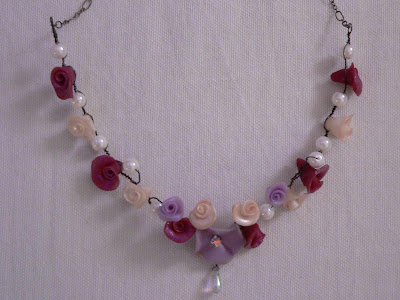
When bride Abbi came in for her tasting appointment, she brought a photo of her wedding gown (a Grecian-inspired column dress) and a very unique necklace she would be wearing with it.  Looking through my portfolio of cakes, her tastes were simple and classic - timeless piping in all white, accented with fresh flowers.  To enhance the somewhat generic design and make it unique to Abbi's wedding, I created small, shimmering fondant flowers similar to those from her necklace, and scattered them throughout the swirling pattern.

 
 So happy my camera picked up on the shimmer.  I used my new favorite Luster Dust, "Antique Silk".
Courtesy of Howard Berg Photography, flowers provided by CamRose Hill Farms

Courtesy of Howard Berg Photography
 Even though this may not be a huge, elaborate cake, I'm very pleased that I could make it one of a kind for the bride and groom.  No matter if a client spends $200 or $2,000, each is equally important and special to me.  Abbi and Paul were married in an outdoor park ceremony, and enjoyed their reception at the Waterstreet Inn, downtown Stillwater. 

Thank you to Howard Berg Photography for sharing the cake photos!

More cake photos and shots from my weekend on Lake Superior coming soon!

Love,
Rachel

Thursday, August 18, 2011

Inspiration

I was discussing this with my grandma, the amazing artist, yesterday.  Oft times it's difficult to accept compliments when you know of so many other outrageously talented artists out there.  Take a look-see what I mean....

http://www.cakeoperaco.com/index.php

I've been waiting to share the Toronto bakery Cake Opera Co. with you.  Awe-inspiring to say the very least!  Not surprisingly, one part of the female duo has a fine art background.  The varied use of texture, color (or lack thereof), mixing fondant with gum paste with jewels, feathers, fabric, painting...innovation and restraint mingle for the ideal balance.  Click here to see some of their amazing and gorgeous spreads.  I promise it will blow your mind.

xoxo,
Rachel


Monday, August 15, 2011

The Cider Chronicles: Part 2 - DIY

You will be surprised how easy it is to make your own hard cider at home.  Although there are some initial investments in equipment, these quickly pay for themselves by providing ample amounts of delicious cider for you and your friends!  Since Mr. Scott is an avid home-brewer of beer, we had the equipment ready to go.  We started a new batch last week, but these photos are from my first time having Mr. Scott instruct me what to do.  Most of the ingredients can be purchased at your local grocery, and for brewing supplies we frequent Northern Brewer on Grand Ave.  You can also order through their website.  Let's get started!

This recipe was given to us by the exemplary Dr. Kai, aka: Kai Dahlin.  A vet school alum, Kai has mentored Scott in the ways of neutering and alcohol making (Quite the combo...).  We are indebted to his fail-proof recipe and mad grilling skillz! 

Ingredients:
5 gallons preservative free Apple Cider
1 pound Brown Sugar
1 packet Nottingham Yeast (available at homebrew supply stores)
1/2 cup plus 2 tablespoons Granulated Sugar
2 cups water
Optional:  Cinnamon sticks, ground cinnamon, apple juice concentrate

Equipment Needed:
Sanitizing solution or powder
2 - 5 Gallon Carboys
Stopper with a hole and an airlock
Funnel
Siphon

5 Gallon bucket with spigot
About 52 empty 12 oz. bottles, of the non-screw top variety
About 52 Caps
Capper

Note:  These instructions are approximate and simplified for entertainment value.  Outside influences, such as temperature, can impact the fermentation duration of the cider and thus the end results.  For detailed recipes, instructions, and troubleshooting, Mr. Scott and I recommend using your local brew shop as a resource for recipe books and printed materials on cider making.  The forums at NorthernBrewer.com are also helpful for fast feedback from both novice and expert brewers.

Step  1:  Clean and sanitize all equipment before use.  Germs and bacteria growing in your juice = bad.  Proof the yeast as directed on the packet.  Meanwhile, combine apple cider, sugar, and the cinnamon/sticks in the carboy.  A funnel is useful.  Pour in the yeast and give it a good stir by rocking the carboy back and forth.  Insert the stopper with an airlock.  Store in a cool, dark place [we have a walk-in front closet with three carboys inside] for about a week.

Step 2:  The cider now needs to be transferred to the other carboy for what is called the Secondary Ferment.  Sanitize the second carboy.  Carefully transfer the cider to this carboy using the siphon, avoiding the mass of the yeast that has settled to the bottom.  Once most of the liquid has been removed, the remaining yeasty goop can be disposed of.  Insert the stopper and airlock again into the top and store in a cool, dark place for roughly 2 to 3 weeks, or a specific gravity of 1.000.  [Nerd alert:  Specific gravity is found using a Refractometer.  This was one of my Christmas presents to Scott last year.  Having one to test the cider will better your likelihood of success, but it isn't absolutely necessary.  Again, proper educational materials can guide you through this process.]

 Step 2:  Clean and sanitize all of your bottling equipment:  The bucket, bottles, and caps.  This handy attachment screws onto the kitchen faucet and shoots water at high pressure into bottles and carboys.


Step 3:  Transfer the cider from the carboy to the bucket with a spigot, again avoiding the yeast settled at the bottom (trust me, you don't want floaties in your bottles).  In a small saucepan, bring the granulated sugar and water to a boil for 10 minutes.  Cool slightly, then pour into the bucket.  You can add a can of apple juice concentrate at this point to pump up the flavor, but isn't required (we're trying this for the first time with the latest batch and omitting the boiled sugar step).  Stir.


 Step 4:  Fill the clean bottles using the spigot.  Cap the bottles using the capper.  The cider will need to ferment and age for anywhere for 2 to 6 months.  During this time it will develop carbonation.  The timing can be a bit tricky.  You can start opening bottles to test the carbonation and flavor after two months.  We've learned that if at first the cider tastes horrible, give it time!  You'll sacrifice a few to testing, but still have plenty to drink.  The cider is ready when it has a good fizz and tastes like apple pie. 


To differentiate my cider bottles from Mr. Scott's beer, I labeled them with Hello Kitty stickers. 

Step 5:  Chill and enjoy!  The estimated alcohol content is 5-12% depending on how much sugar you add, so drink responsibly!

Not too complicated, right?  For a few hours of working time and the cost of ingredients, the yield is five gallons of delicious fermented nectar!  Try not to be too upset when it's gone.

Best wishes,
Rachel and Scott


Friday, August 12, 2011

Nautical Wedding Cake

HUGE thanks to Kate and Sam of Kate Botwinski Photography for sending me multiple images of this cake I did two weeks ago.  I have to tell you what a pleasure it is to receive photos from photographers.  It's like seeing your work through someone else's eyes.  I enjoy seeing the cake from different angles that I may not have noticed before.  This is why I'm not a photographer!  You can visit Kate's blog for more stunning photos of the wedding, held at White Bear Yacht Club (Hello, Claire!).

This is a riff on a cake design I came up with a couple years ago.  We tweaked it a little, changing the layers and colors, and adding the anchor topper, which is made from white chocolate and planted with edible silver.  When I saw the photo of the ring pillow afterwards on the blog, I couldn't believe how perfectly they matched!


Working on two pretty cakes for weddings tomorrow that I can't wait to share with you!
Love,
Rachel

Thursday, August 11, 2011

Le Petit Boulangere


My mom dug these up recently doing some summer cleaning.  It's so funny to look at these and think, Wow!  Who would of thunk I'd be doing this for a living when I grew up?  I didn't consider baking as a career until I was about a junior in high school.  I've come a long way...but there is so much more yet to accomplish.

Top left:  My favorite of them all.  The badass multitasker, chatting into a spoon rest and cooking the goods at the same time.  Around age 3-4.

Top right:  All I want for Christmas is Barbies and a mixer with interchangeable batters!!!  Wearing a slip as a dress again...

Center:  Age 4-5.  Not sure what I'm kneading.  Home perm credits: Aunt Nancy.

Bottom:  Another perm.  Age 6 or 7?  It's my birthday and that's my first and last Easy Bake Oven.   My birthday is the day after Christmas, and I specifically remember the Easy Bake being at the top of my wish list.  Christmas day passed, no oven.  They made me wait until my birthday!  We still have it in storage - might have to go on display in my bakery someday.


Thank you to all of my loyal readers; your support and enthusiasm touches me on a daily basis!   

-Rachel

Tuesday, August 9, 2011

Two Groom's Cakes

Groom's cakes, whether served at a rehearsal dinner or the wedding reception, are typically pure fun.  This first cake was to resemble a Chris Craft boat with the groom's beloved bulldog in the driver's seat.  I imprinted the the outlines of the wood by hand and then "varnished" each one using a mixture of food coloring and simple syrup.  The windshield is a sheet of gelatin I cut to size.  I'm waiting for professional shots of the wedding cake before posting it on here.  The ceremony and reception were held at the White Bear Yacht Club on White Bear Lake in Dellwood, MN (about 20 minutes from the bakery).  You are in for a treat with this adorable nautical themed wedding!  Take a sneak peak at the photographer's website/blog, http://katebotwinskiblog.com.  The seersucker suits were off the chain! 


Inside, Red Velvet cake with layers of cream cheese icing and vanilla buttercream.


This next cake was for a co-worker's brother, and she knew exactly what she wanted:  A tuxedo cake with a Teenage Mutant Ninja Turtle, Raphael specifically, poking out of the pocket.  The pink tie and pocket square match the wedding colors, naturally.  Liz let me know the cake was a hit and her brother ate the TMNT :)  This was a lot of fun to work on.  Mr. Scott is also a fan.

Chocolate cake, Bailey's mousse, and chocolate ganache.  Yummmm....

xoxo,
Rachel

Monday, August 8, 2011

Cupcakes Reanimated


In case you missed it, see the preliminary post and learn about my love-hate relationship with cupcakes here.

Jack of all Trades

Hi!  There is quite the back story to what you are about to see.  I've been stressed about work lately, and after some tearful conversations with Mom, I vowed to take more time outside of my job to focus on relaxation, hobbies, and basically thinking about anything other than cakes.  Don't get me wrong, I love my career, but I'm learning to draw the boundaries between personal and professional time.  I realized that by overworking and over stressing, I'm doing a disservice not only to myself, but my boyfriend, my coworkers, and my clients.

Yadda yadda yadda....So I have been wanting to take up sewing for quite a while.  I took lessons way back in the day (aka: The 90's.  Age 10?).  My mom and grandma have been sewing for me all my life.  Halloween costumes, Easter dresses, Christmas dresses, and lots of cute everyday wear in between (Lycra bicycle shorts with matching neon top, hells yes!).  This culminated with a jaw-dropping dress Grandma put together for my Senior Prom:  A mossy-green silk shantung masterpiece with a low back and gathers on the bum.  One of my most proud and beautiful moments was wearing that dress.

Flash forward to last Christmas.  I had been planning to hunt garage sales for a used sewing machine, but my aunt and uncle who live here locally surprised me with a brand spankin' new machine with lots of bells and whistles.  I love it!  It's so handy, even if I don't have a full blown project going, I enjoy having the option to tailor my own clothes (a life-changer for us busty midgets).

Somewhere along the line, my brother sent me a dress/muumuu from Iraq.  I have so much admiration for my brother and the work he did with our allies there.  The dress was fantastic, but due to my aforementioned midget proportions, we were entering Snuggie territory.  I envisioned turning it into something really wearable so that it wouldn't sit in my closet and go unadmired.

Before


Murph's attempt at ironing.

Not gonna lie, I didn't have much experience with reading patterns, and this was tough.  Definitely needed to brush up on my seamstress lingo, but not only that, my last experience actually sewing something myself was something like an apron.  I had never used bias tape before (to finish the neck and arm holes) and had to watch some YouTube tutorials to figure that business out.  This is the pattern I used, with some alterations of my own.  I can't wait to use it again!

After

Photography by Mr. Scott
With my favorite leopard shoes from Target.


Belted


I ended up using the bottom half of the dress because its so blasted hot here in God's Forgotten Land {Minnesota}, an open neck was a must.  I would like to use the top remnants to make a sparkly bag or clutch. 

And you know how much this project cost me?  About $10!  Yay for completing this summertime goal! 

xoxo,
Rachel